I became a co-leader to a Daisy Girl Scout Troop this year, and it has been so much fun! It also gives me a chance to use my creative gifts for my daughter!
I wanted to share a few things I have made for the troop, especially for our recent Investiture Ceremony, where the girls were officially welcomed into the Girl Scout Family.
Above is the Badge Baggie that I made for each girl. I used snack sized bags, cut some blue cardstock to match the width of it, and cut it to 5 inches that could be folded. I cut a ton of daisies on my Cricut, then added a yellow button to each. I hand lettered their names, adding dots to each to make it fun and kiddie.
We also gave each girl a certificate for their welcome into Girl Scouts. It was based on ones we had seen but we did make it ourselves. HERE is the link so that you can use it as well. Don't worry if it looks like two pages on the download. When you actually open it in Word, it will look normal. HERE is the one made for our Girl Scout Moms.
I made cupcake toppers as well, using the PDF from Girl Scouts with the Daisy Flower characters on it. I glued them onto the daisies from the Cricut.
One of the talented moms in our troop made these awesome hair bows for each girl! They loved them!!
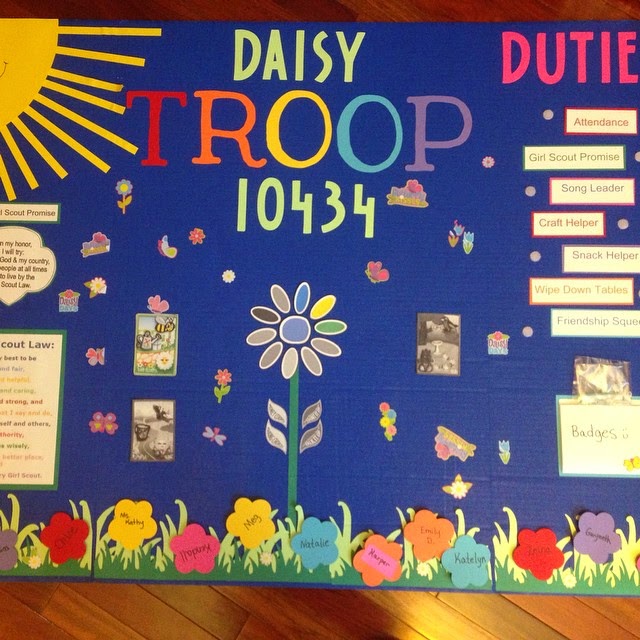
This Kaper Chart was used at the ceremony, but it was made for our meetings. It has the Girl Scout Promise, the Laws, black and white badges (I add the color to it as we earn them), a list of duties the girls do at each meeting, a pocket for the colored badges, and flowers at the bottom that are for each girl. We randomly mix up the flowers and assign them duties before each meeting. (Each has velcro dots on the back). It can be a pain to bring to each meeting, especially in bad weather, but it looks great and the girls love it! Just be sure to use good glue (not a glue stick) so that the pieces don't fall off and get lost. All of the letters were cut on my Cricut, as well as the flowers and grass. I printed out the words and matted them, and did the sun freehand. I printed out all of the badges in both black/white and color and cut them out.
We also had a great script for the ceremony, put together by our leader. Click HERE to see it!
Thanks for stopping by!
Jess
Saturday, January 17, 2015
Thursday, January 1, 2015
Finally Sharing December Daily 2013!!
I never did share my December book from 2013, so before I share my current December book, I wanted to share our adventure from last year.
Cover (used a Simple Stories album)
Inside cover and title page (i usually provide an intro to the book)
Yep! That is Amy Tangerine!! And Me!!
Simple 4x6 divided page. I had to add paper on the sides since Walgreens prints those TruDigital, which are slightly smaller.
Another simple, divided page.
Page on a ledger page which was provided in book.
Ledger page from book.
Added a tag as a divider.
Journalled on tag. Another simple divided page.
Divided page
Divided page with 2 4x4s and a 8x2.
Reverse of above.
Green polka dot came with album.
Simple, no fuss page.
Notebook paper provided in album. I wrote our travel story on it.
Reverse of notebook paper.
Divider came with book. Love them since they helped me to split up our month nicely.
Reverse of divider.
Simple divided page. Used the 8x2 area for an additional picture.
Divided page.
Random gift tags. Leo got a batcave so the tag from that was included.
Added a photo card from family.
Used the back of the photo card to add another one plus some journalling.
Another divided page.
Her first haircut!!!
Tag is removeable
Tag is removeable
A photo I made on Rhonna app.
Used back of my Rhonna sign to add another photo card sent by family.
Another photo made on the Rhonna app.
Added another photo to the back.
Done on one of the provided pages.
Done on a provided page.
Happy Scrappy Savings!!
Jess
Subscribe to:
Comments (Atom)


